UHelp-Support Ticketing System
Live chat
- New Chats
- My Opened Chats
- Solved Chats
- Operators Chat
- Chat Responses
- Live Chat Settings
- Live Chat Ratings
- Introduction: In the realm of customer support and engagement, real-time communication is paramount. Our Live Chat feature within the support system application offers a dynamic platform for operators and customers to interact seamlessly. This documentation serves as a comprehensive guide, detailing the functionality and navigation of each page within the Live Chat section. From initiating conversations to resolving queries, operators can leverage various tools and features to deliver prompt, personalized assistance. Let's delve into the intricacies of each page to ensure efficient communication and optimal customer satisfaction.
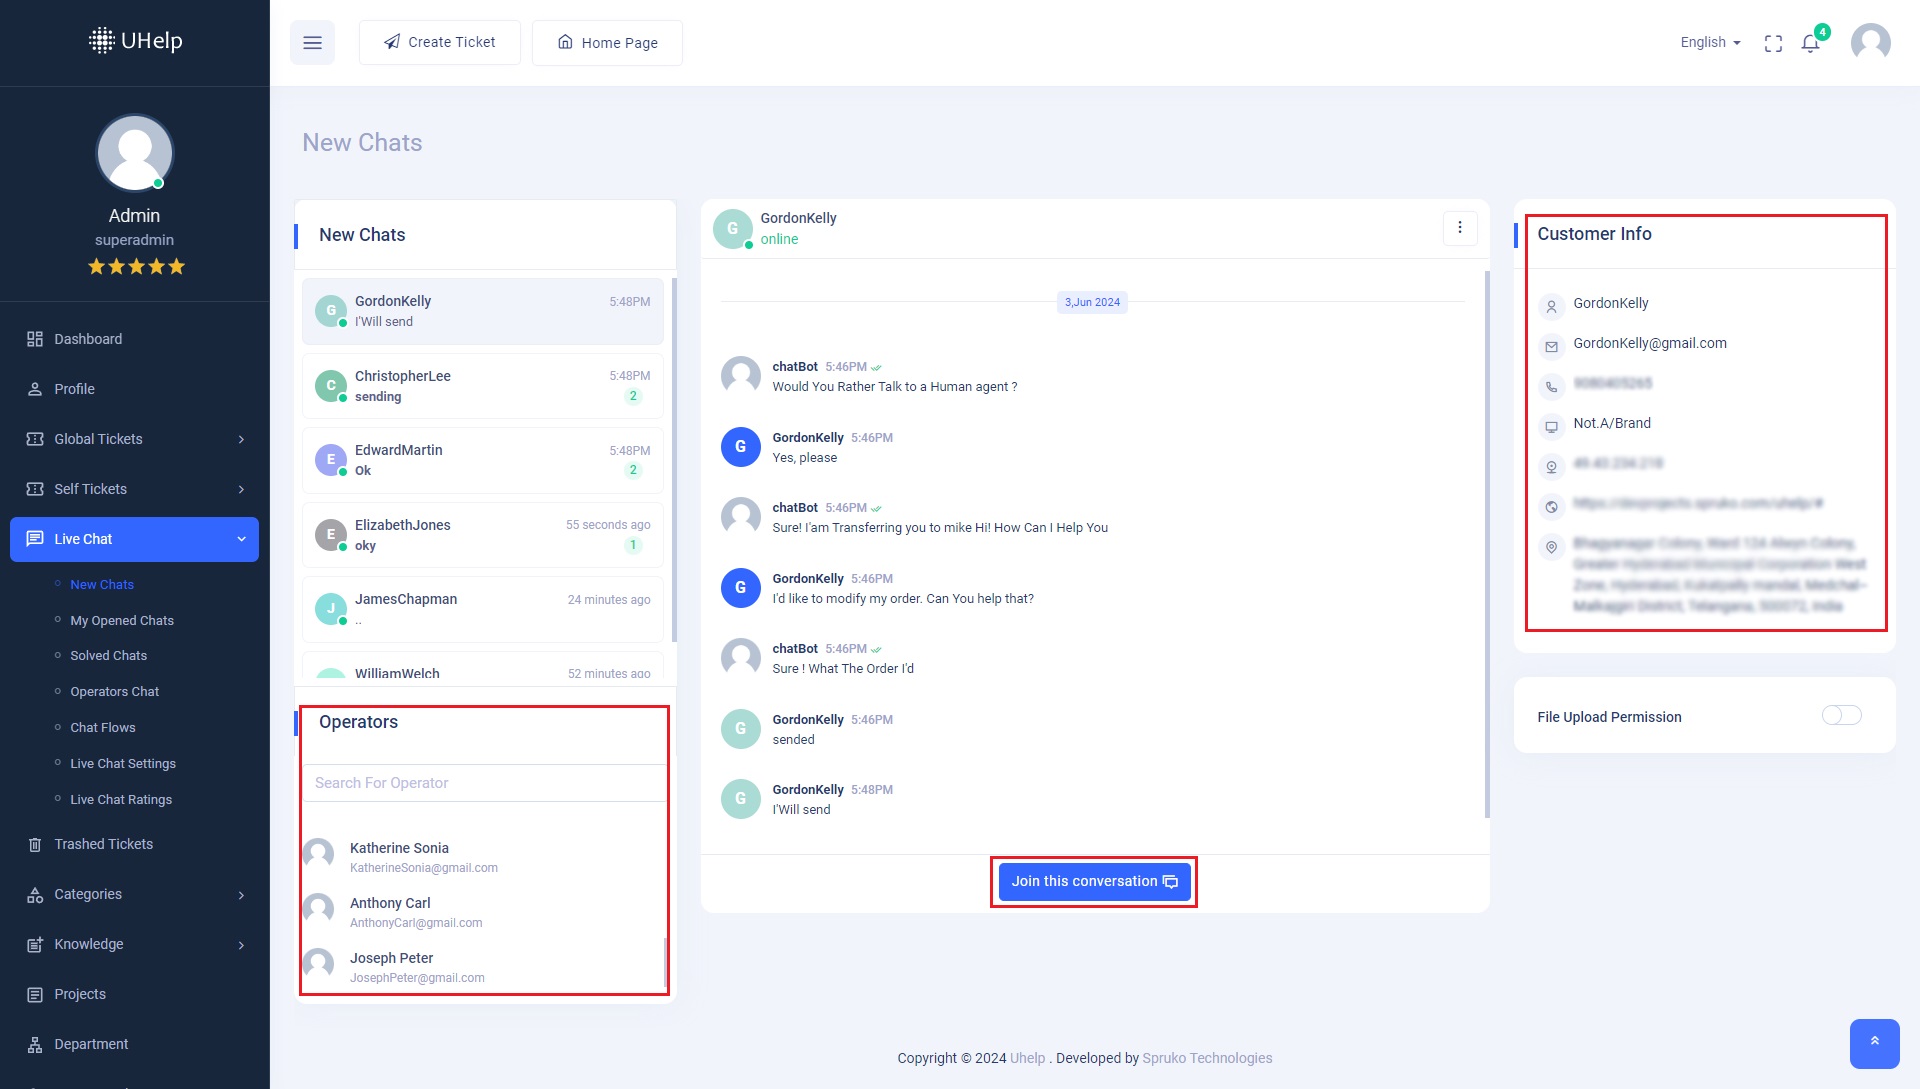
- Description: The "New Chats" page serves as a centralized hub for incoming customer inquiries. It presents operators with a list of new chats initiated by customers, providing immediate visibility into pending conversations.
- Operator Interaction: Operators granted access to this section can seamlessly engage with customers by clicking on the "Join This Conversation" button. Upon clicking the "Join This Conversation" button, operators are swiftly connected to the respective chat, enabling prompt assistance and support.
- Chat Management Options: Within the chat interface, operators are equipped with several tools to streamline communication and enhance efficiency. Notably, the availability of predefined responses through the "Canned Response" feature facilitates rapid replies, while the "Create Ticket" option enables operators to seamlessly escalate inquiries to the ticketing system for further handling.
- Customer Information Display: Adjacent to each chat instance, pertinent details about the customer are prominently displayed, empowering operators with valuable context to deliver personalized assistance. Additionally, the "Customer Info" section provides comprehensive insights into customer profiles, facilitating informed interactions and tailored support solutions.
-
Operator Collaboration:
The "Operators" section provides a comprehensive overview of all operators within the system, facilitating efficient management of chat engagements and collaborative support efforts.
To optimize workflow and ensure effective resolution of customer queries, operators can leverage collaborative features such as chat re-assignment and deletion. By accessing the dropdown menu denoted by the three vertical dots (.), operators can efficiently re-assign chats to colleagues or delete irrelevant conversations, fostering seamless teamwork and customer-centric service delivery.
A search input feature enables users to quickly locate specific operators based on their names or other relevant criteria. Clicking on an operator's name redirects users to their respective "My Opened Chats" page. Here, operators can view all ongoing conversations associated with the selected operator. Operators have the flexibility to re-assign chats to other team members or actively participate in ongoing discussions as needed, fostering seamless collaboration and effective resolution of customer inquiries.
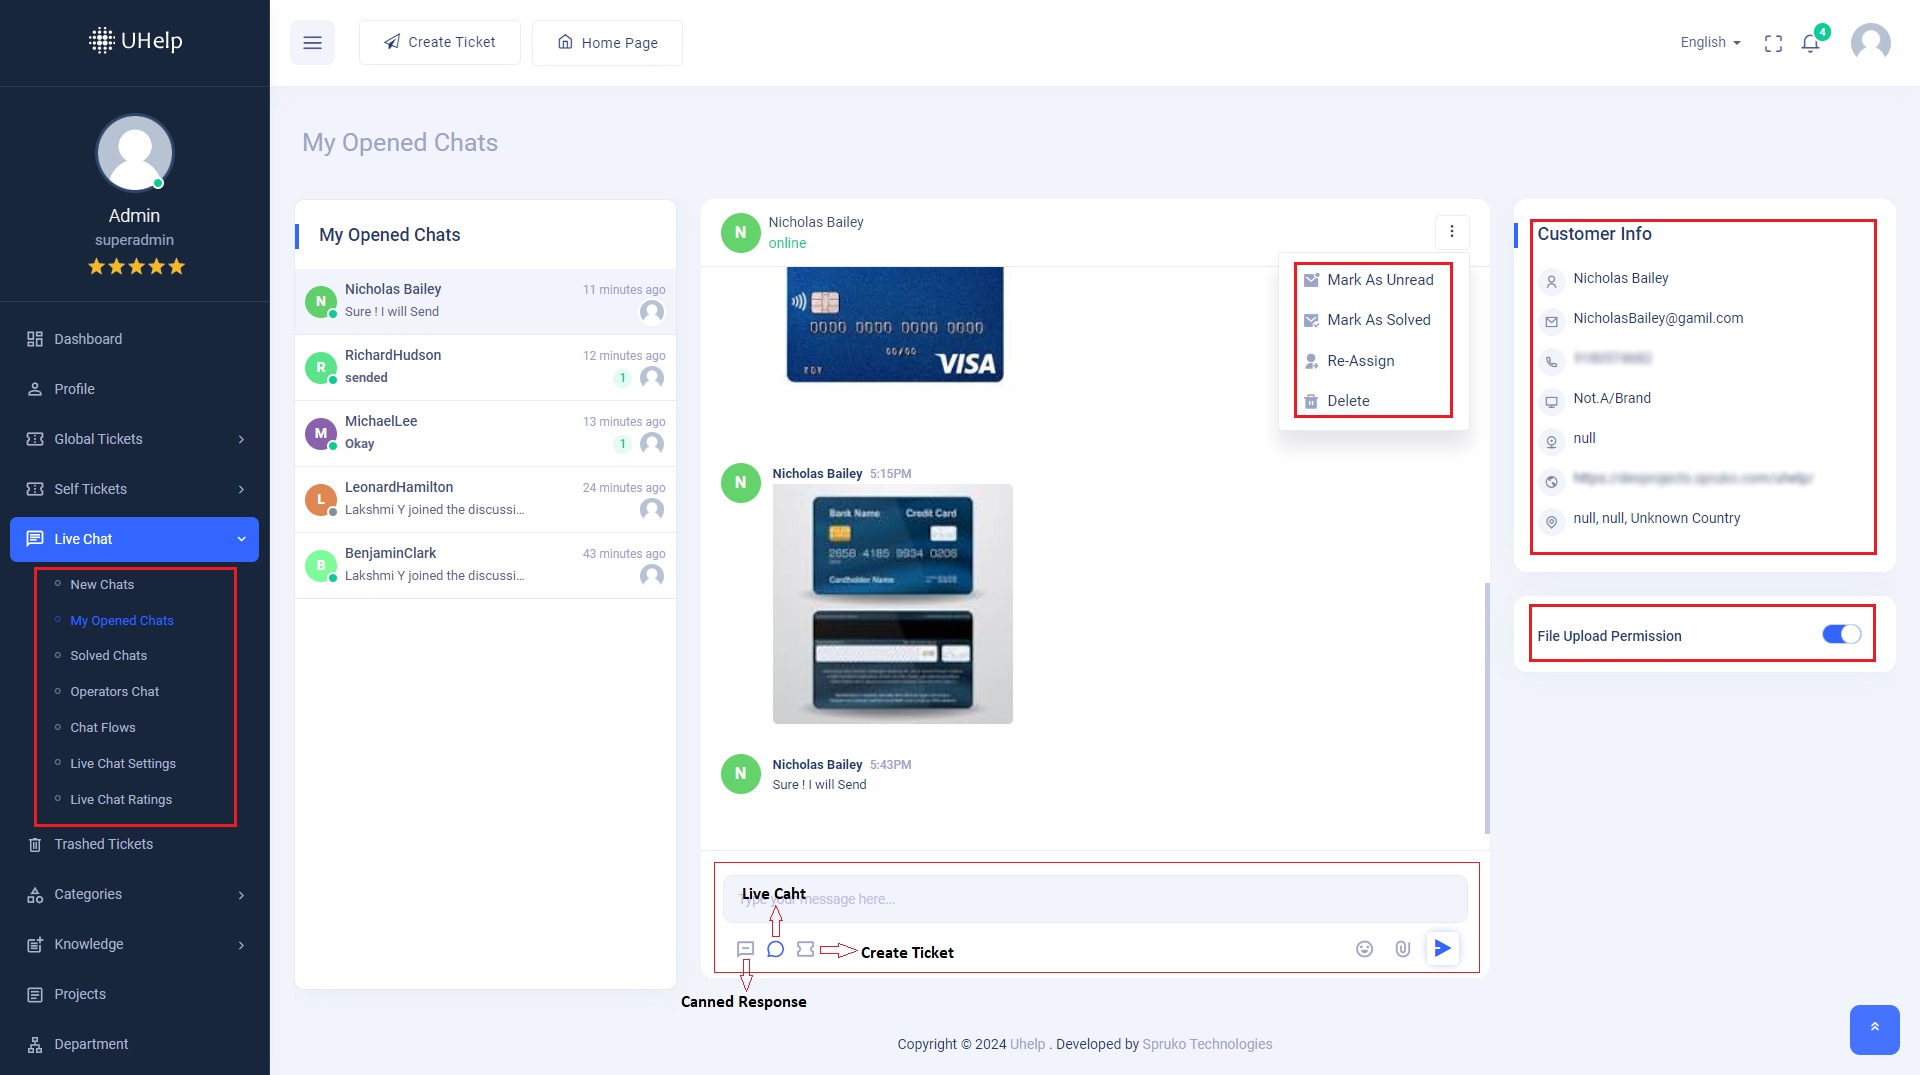
- Description: The "My Opened Chats" page provides operators with a comprehensive overview of chats in progress, specifically those they are currently engaged in. This page is accessible only to operators with the necessary permissions.
- Chat Management: Operators can perform various actions on individual chats by clicking on the three vertical dots (.) located within the chat header. These actions include marking chats as unread, marking them as solved, re-assigning chats to other operators, or deleting them as needed.
- Customer Information: Alongside each chat, relevant customer information is displayed, enabling operators to gain insights into the customer's profile and history. Additionally, operators have the option to grant file upload permission to customers individually if there is no global permission enabled in the application. facilitating the exchange of files during chat sessions.
- Workflow Optimization: By leveraging the functionality of this page, operators can efficiently manage ongoing chat interactions, ensuring timely responses and effective resolution of customer inquiries. The ability to mark chats as unread or solved, as well as re-assigning or deleting them, enhances workflow optimization and productivity within the support system application.
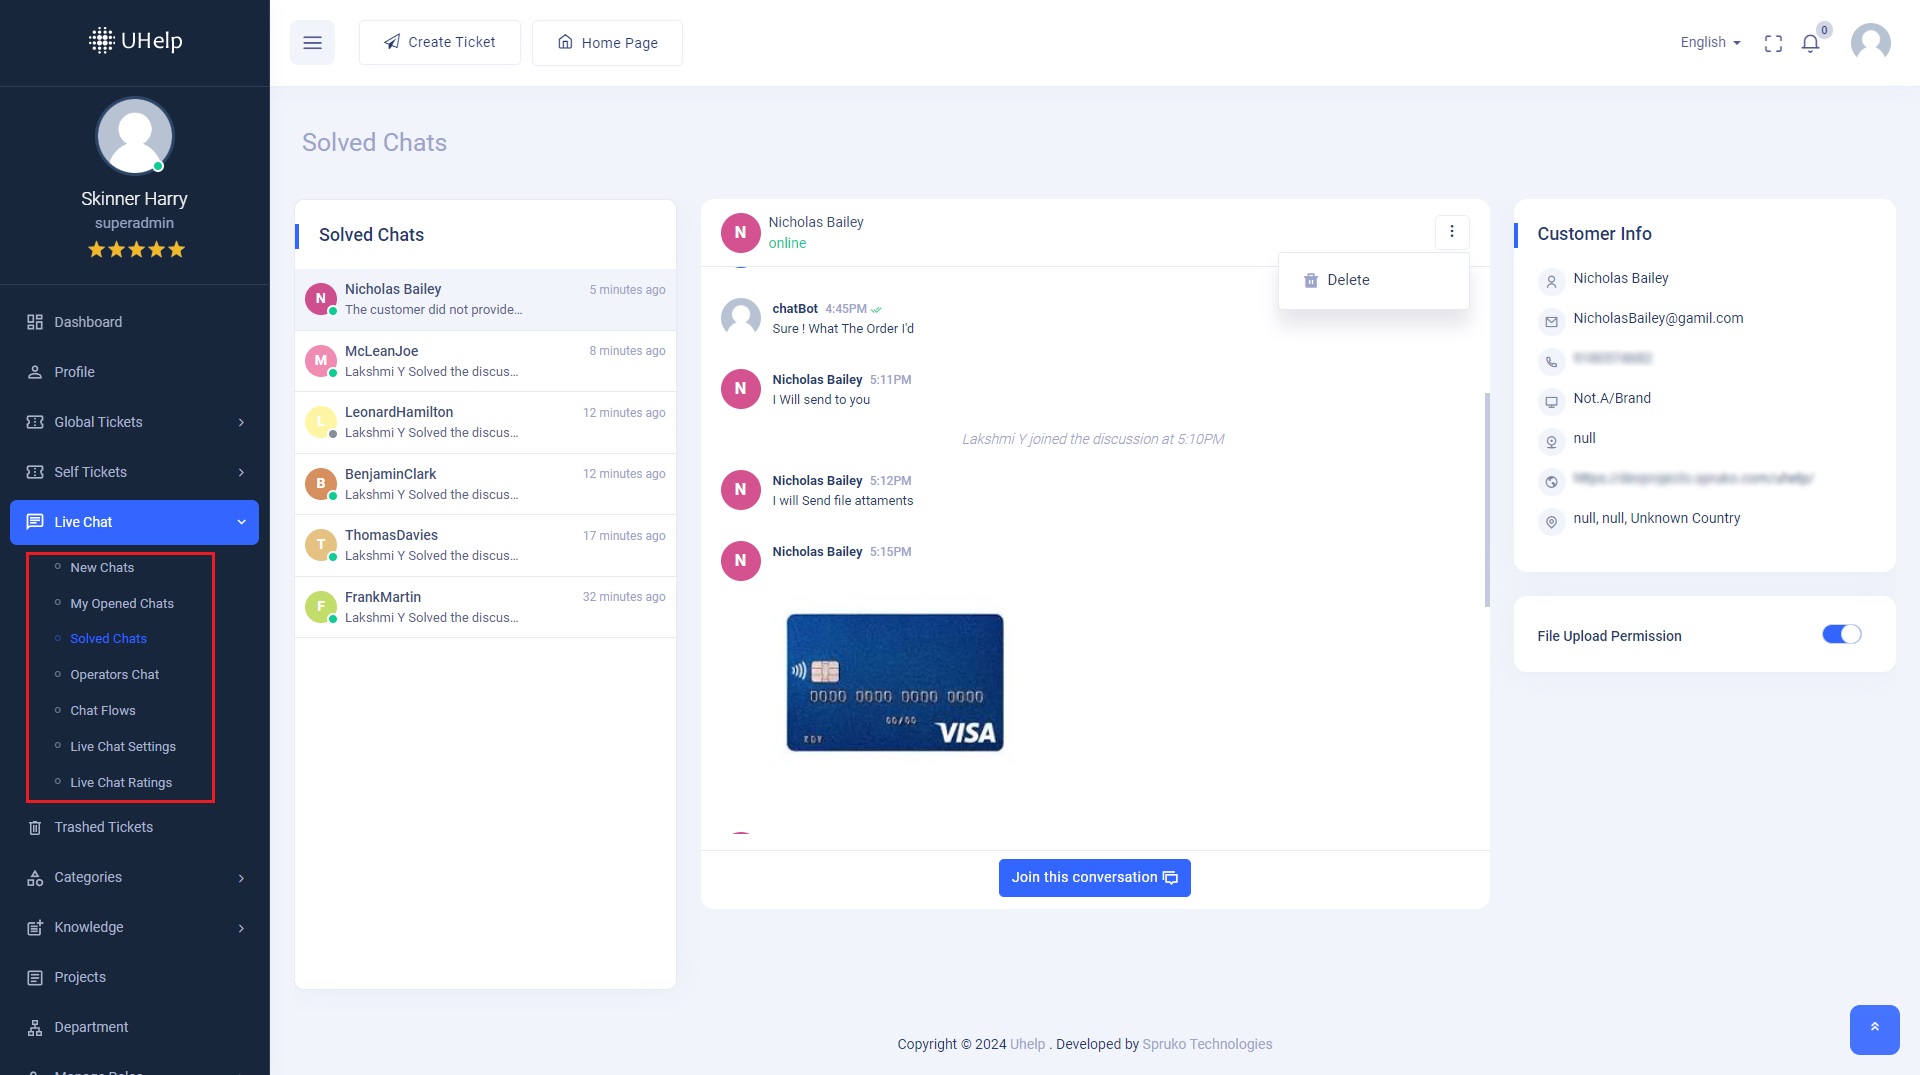
- Description: The "Solved Chats" page serves as a repository for conversations that have been successfully resolved by individual operators. This section offers valuable insights into past interactions and outcomes, facilitating comprehensive record-keeping and performance analysis within the support system application.
- Resolved Conversations: Solved chats are archived within this section, providing operators with a comprehensive overview of past interactions that have been successfully concluded. The availability of historical chat data enables operators to review past resolutions, track customer inquiries, and identify trends or recurring issues for further analysis.
- Performance Evaluation: Operators and administrators can utilize the Solved Chats section to assess individual and team performance metrics. By reviewing past interactions and resolutions, stakeholders can identify areas of strength and opportunities for improvement, ultimately enhancing overall service quality and customer satisfaction.
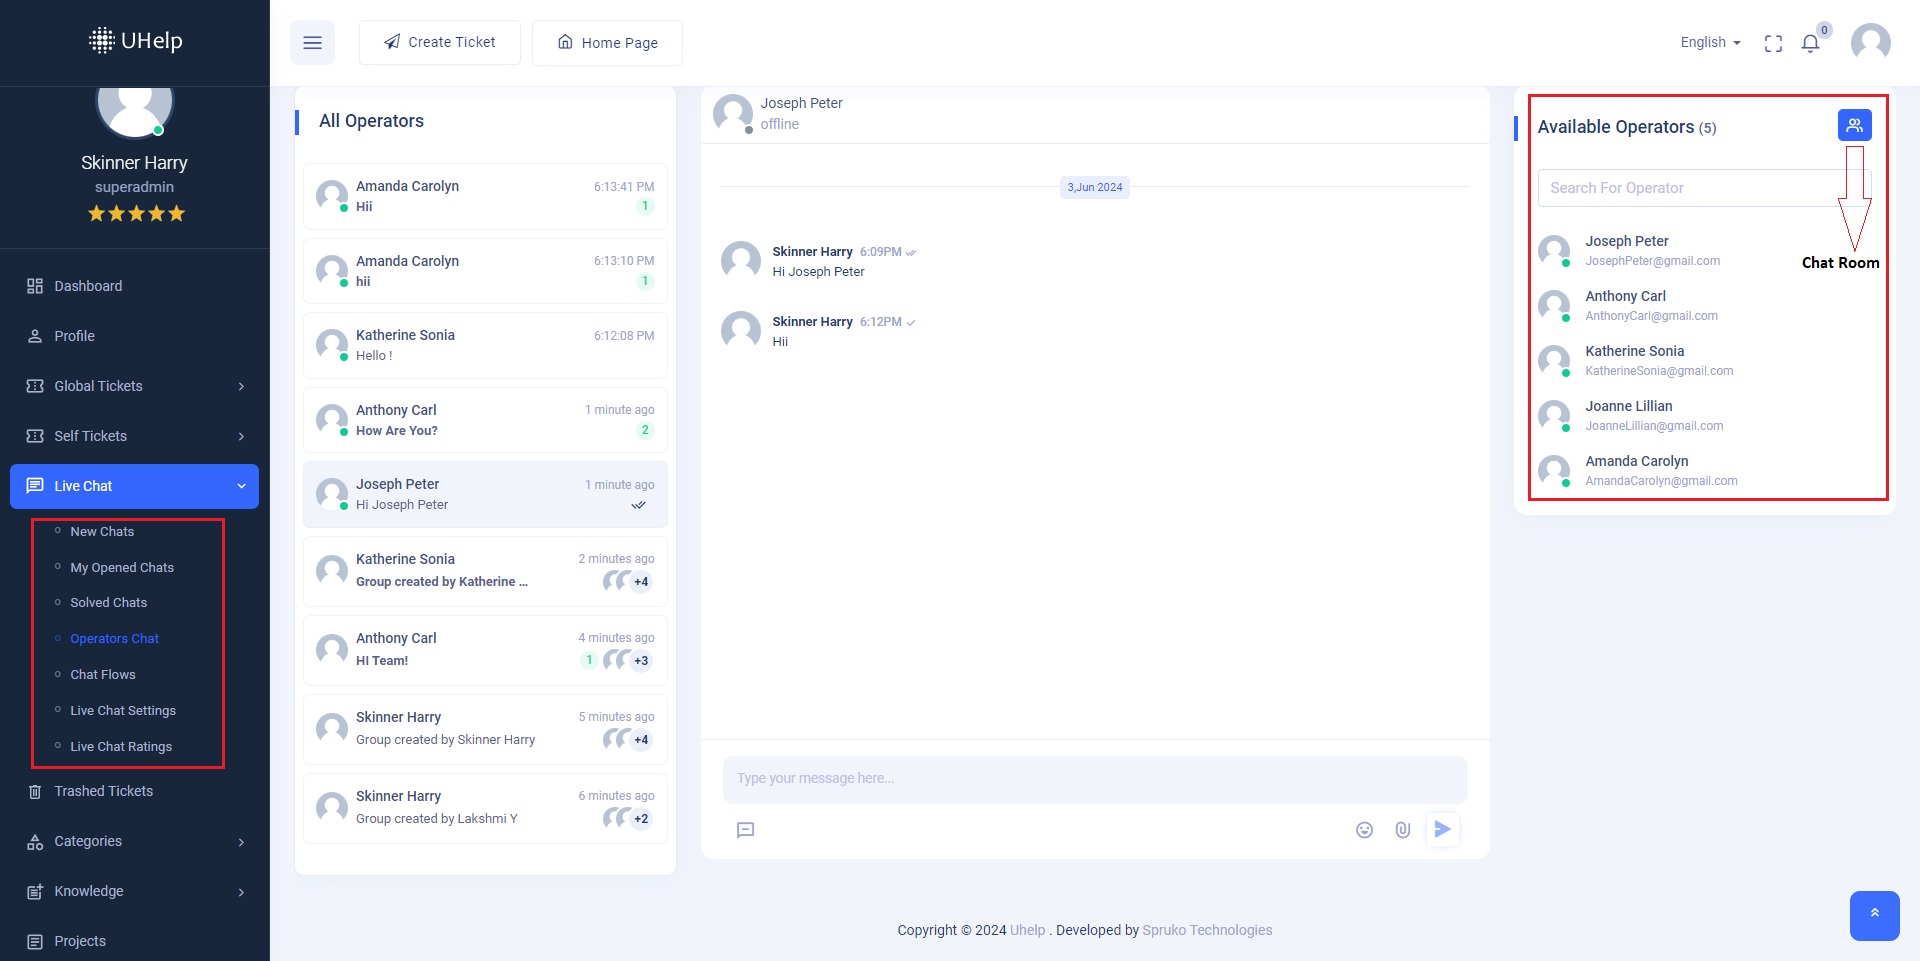
- Description: The "Operators Chat" page provides a platform for operators to engage in internal communications and collaborative discussions within the support system application. Here's a deeper dive into its functionality
- Conversation Hub for Operators: The "Operators Chat" page serves as a centralized hub where operators can engage in conversations among themselves, fostering teamwork and collaboration. Operators granted access to this section can view and participate in discussions with their colleagues, facilitating real-time communication and knowledge sharing.
- Available Operators Selection: Within the "Operators Chat" page, a section titled "Available Operators" is located on the right side. Logged-in operators can utilize this section to select available colleagues with whom they wish to initiate a chat. By choosing from the list of available operators, operators can seamlessly connect and engage in one-on-one or group discussions, enhancing communication and coordination within the team.
-
Creation of Chat Rooms:
- The "Operators" section also features a "Chat Room" button within the "Available Operators" section.
- Clicking on this button initiates the creation of a chat room, enabling operators to engage in group conversations with selected colleagues.
- Upon clicking "Create Room," a chat room is established, and all operators selected for the conversation are included, irrespective of their availability status.
- Operators with permission to access the "Operators" page can leverage this feature to facilitate group discussions, brainstorming sessions, or collaborative problem-solving efforts, fostering teamwork and synergy within the support system application.
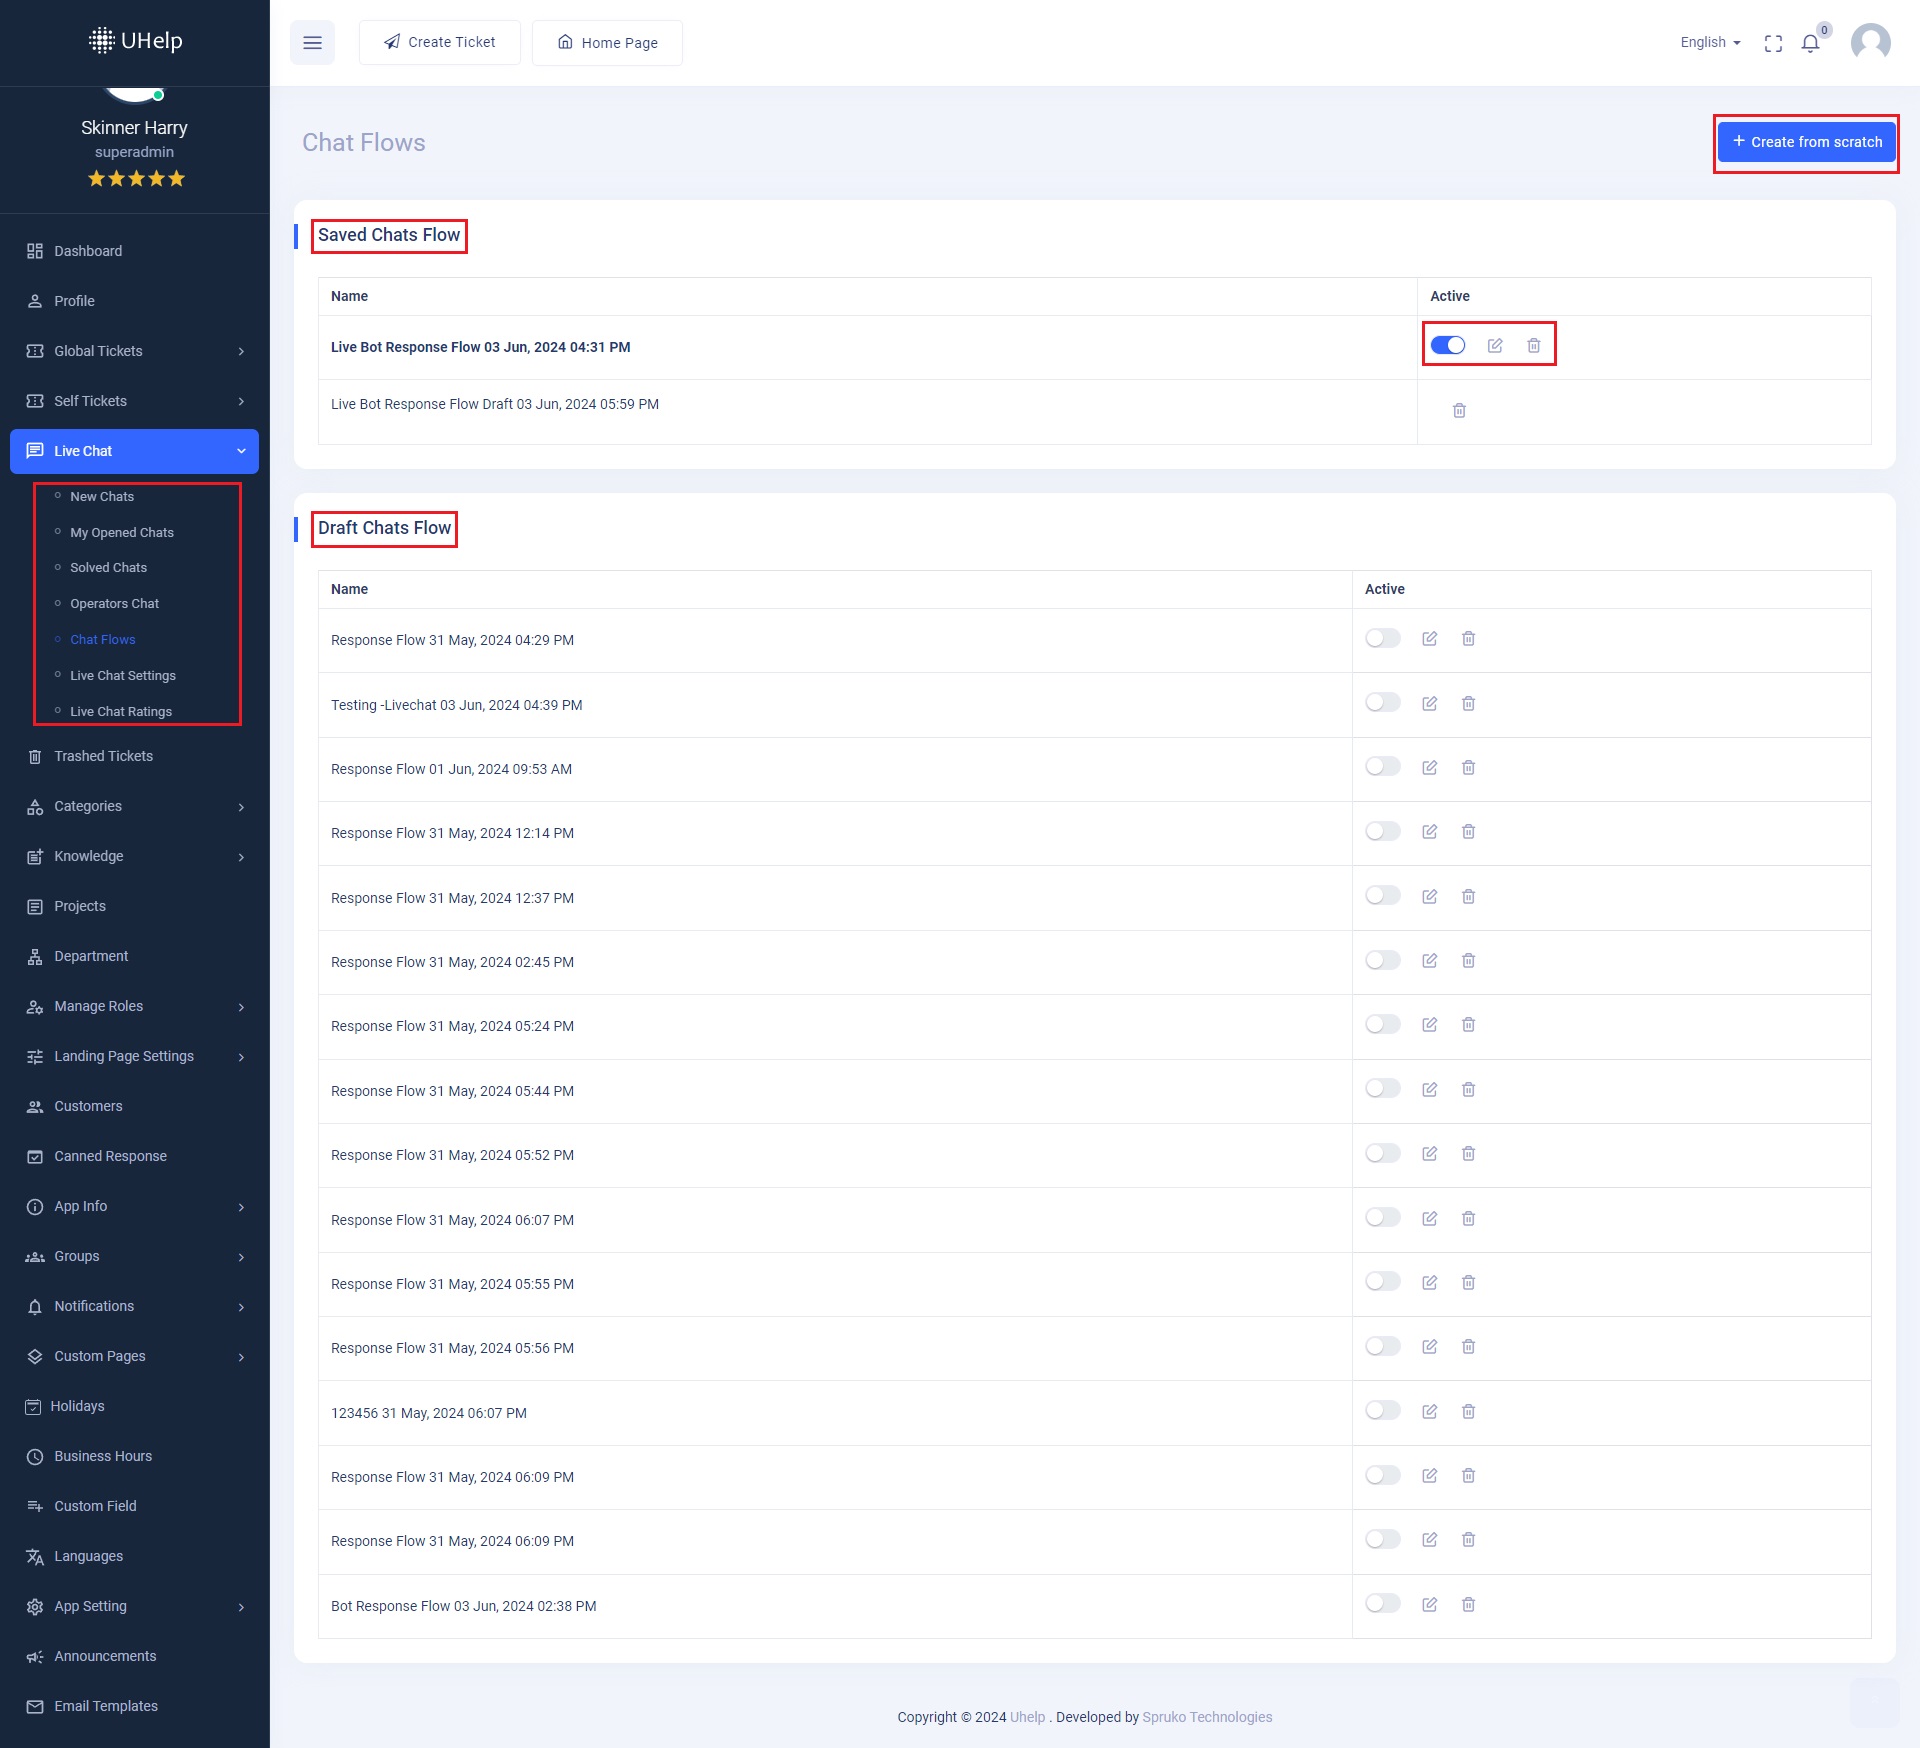
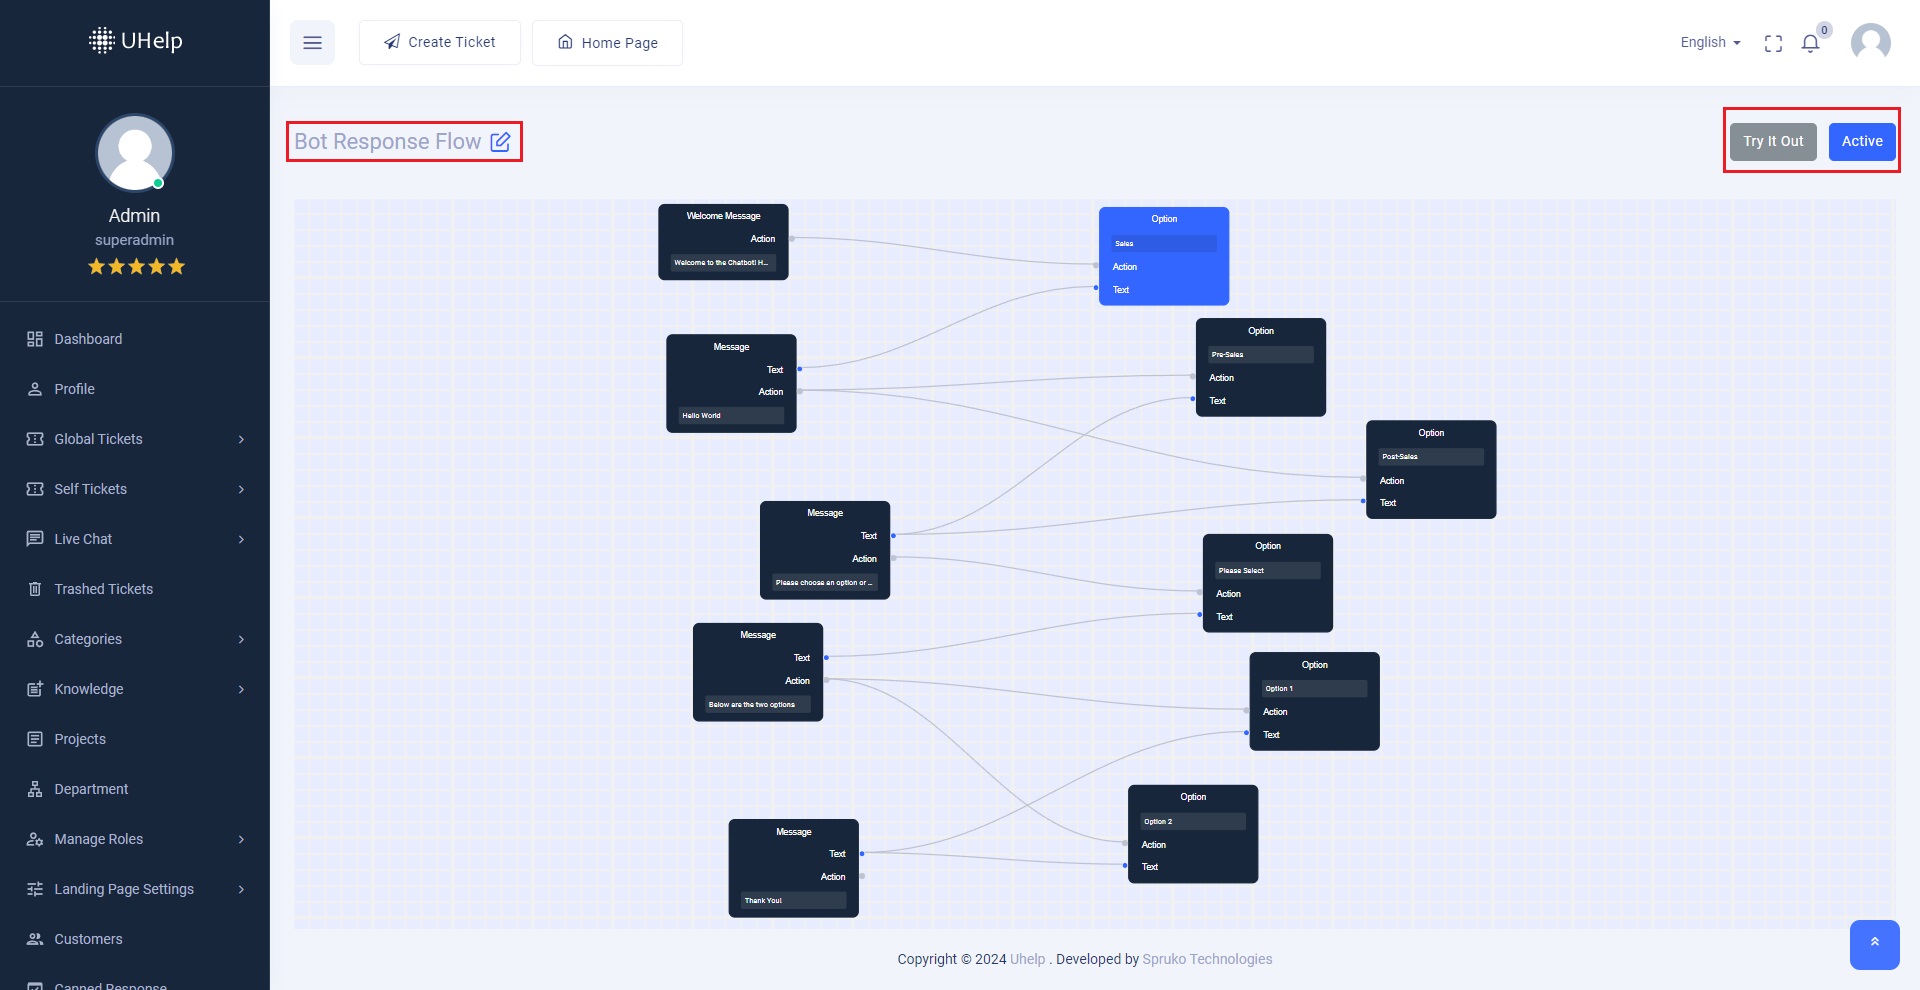
- Introduction: The "Chat Flows" feature enables users to design and manage interactive chat experiences within the support system. Users can create custom chat flows tailored to specific scenarios, guiding customers through predefined conversational paths.
- Creating a New Chat Flow: Users can initiate the creation of a new chat flow by clicking the "Create from scratch" button. This action redirects users to the "Response Flow" page, where they can commence building their chat flow from scratch.
-
Understanding Chat Flow Components:
- Each chat flow comprises three essential components:
- Welcome Message: This initial message serves as the entry point for customers engaging in the chat. Users cannot delete the welcome message but can edit its content.
- Message: Messages serve as inputs within the chat flow, providing responses or prompts to customers based on their interactions.
- Option: Options represent the potential outputs of the chat flow, guiding customers to subsequent messages or actions based on their selections.
- Editing and Connecting Nodes: Users can edit, delete, or create new messages and options by right-clicking the mouse and selecting the appropriate action from the menu. It's essential to maintain the flow's logical progression by connecting message inputs to option outputs. While connections between different types of nodes are allowed, connections between identical nodes (e.g., message to message) are prohibited.
- Node Types: Within the chat flow, users encounter two node types: "Text" and "Action." "Text" nodes facilitate the delivery of textual responses to customers, while "Action" nodes execute predefined actions within the chat flow.
- Testing and Activation: To evaluate the chat flow's functionality, users can simulate customer interactions by clicking the "Try it Out" button. Once satisfied with the flow's performance, users can activate it for customer-facing display by clicking the "Active" button.
- Auto-save Functionality: The chat flow system incorporates auto-save functionality, ensuring that any modifications or additions made to existing or new flows are promptly saved. Drafts of chat flows are automatically saved separately, providing users with a safety net for iterative refinement and experimentation.
- Example Scenario: Consider a scenario where a customer engages in a chat to order coffee. Upon initiating the chat, a bot response welcomes the customer and presents three options: "Cappuccinos," "Espresso Shots," and "Flat Whites." Depending on the customer's selection, the chat flow progresses accordingly, guiding the customer through the ordering process with additional options and responses.
- SSL Data
- LiveChat
- Live Chat Script
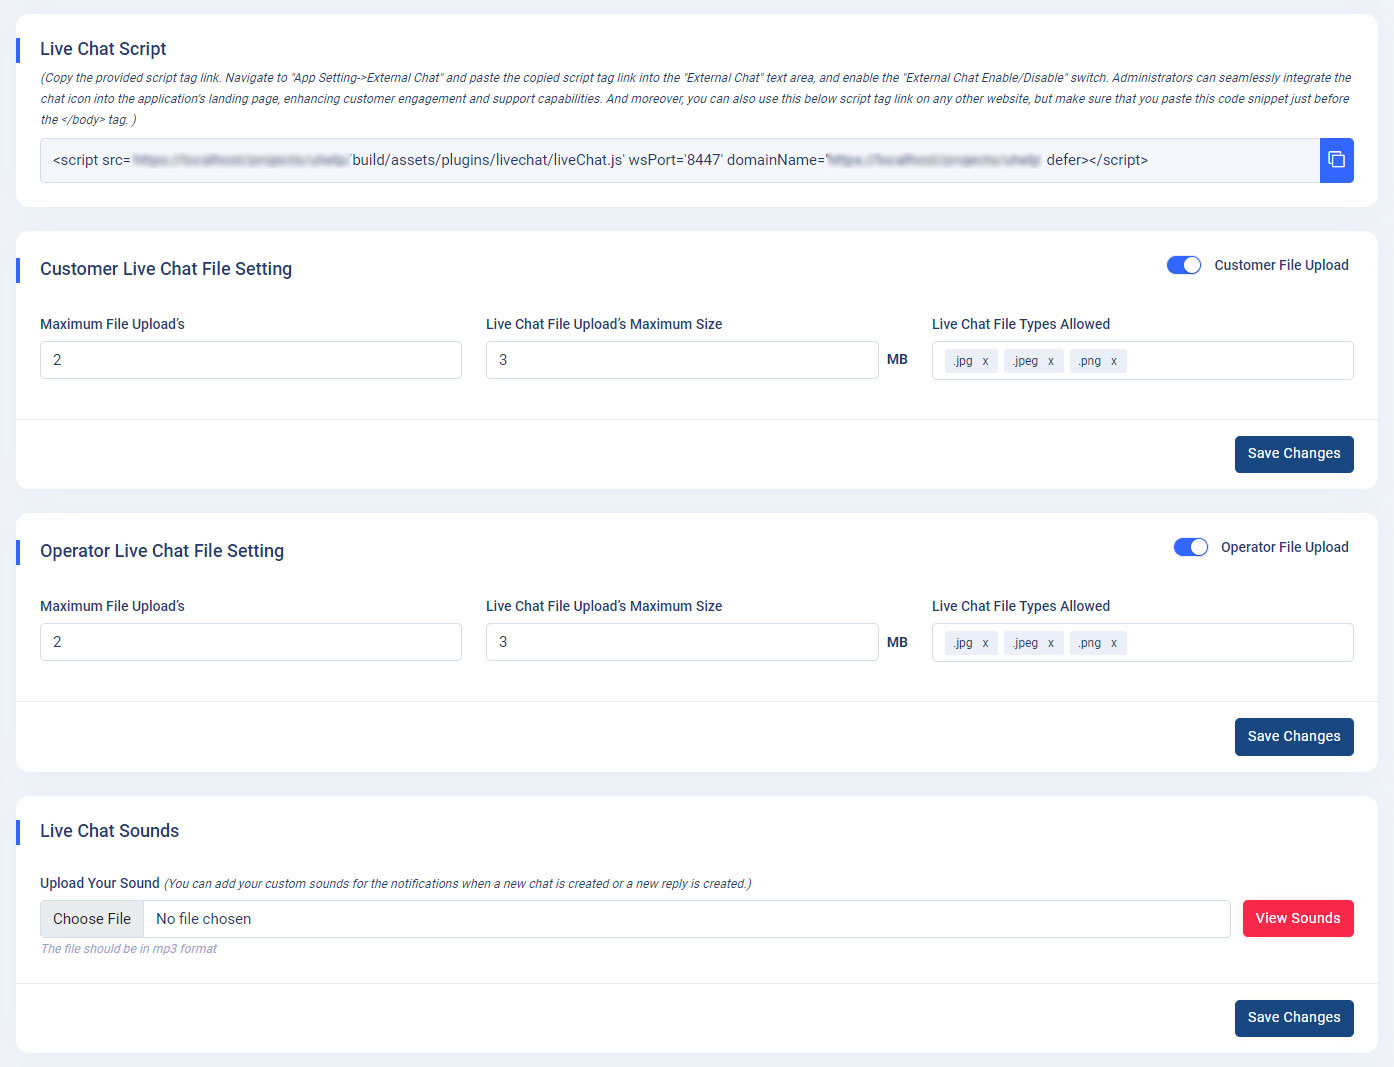
- Customer/Operator Live Chat File Setting
- Live Chat Sounds
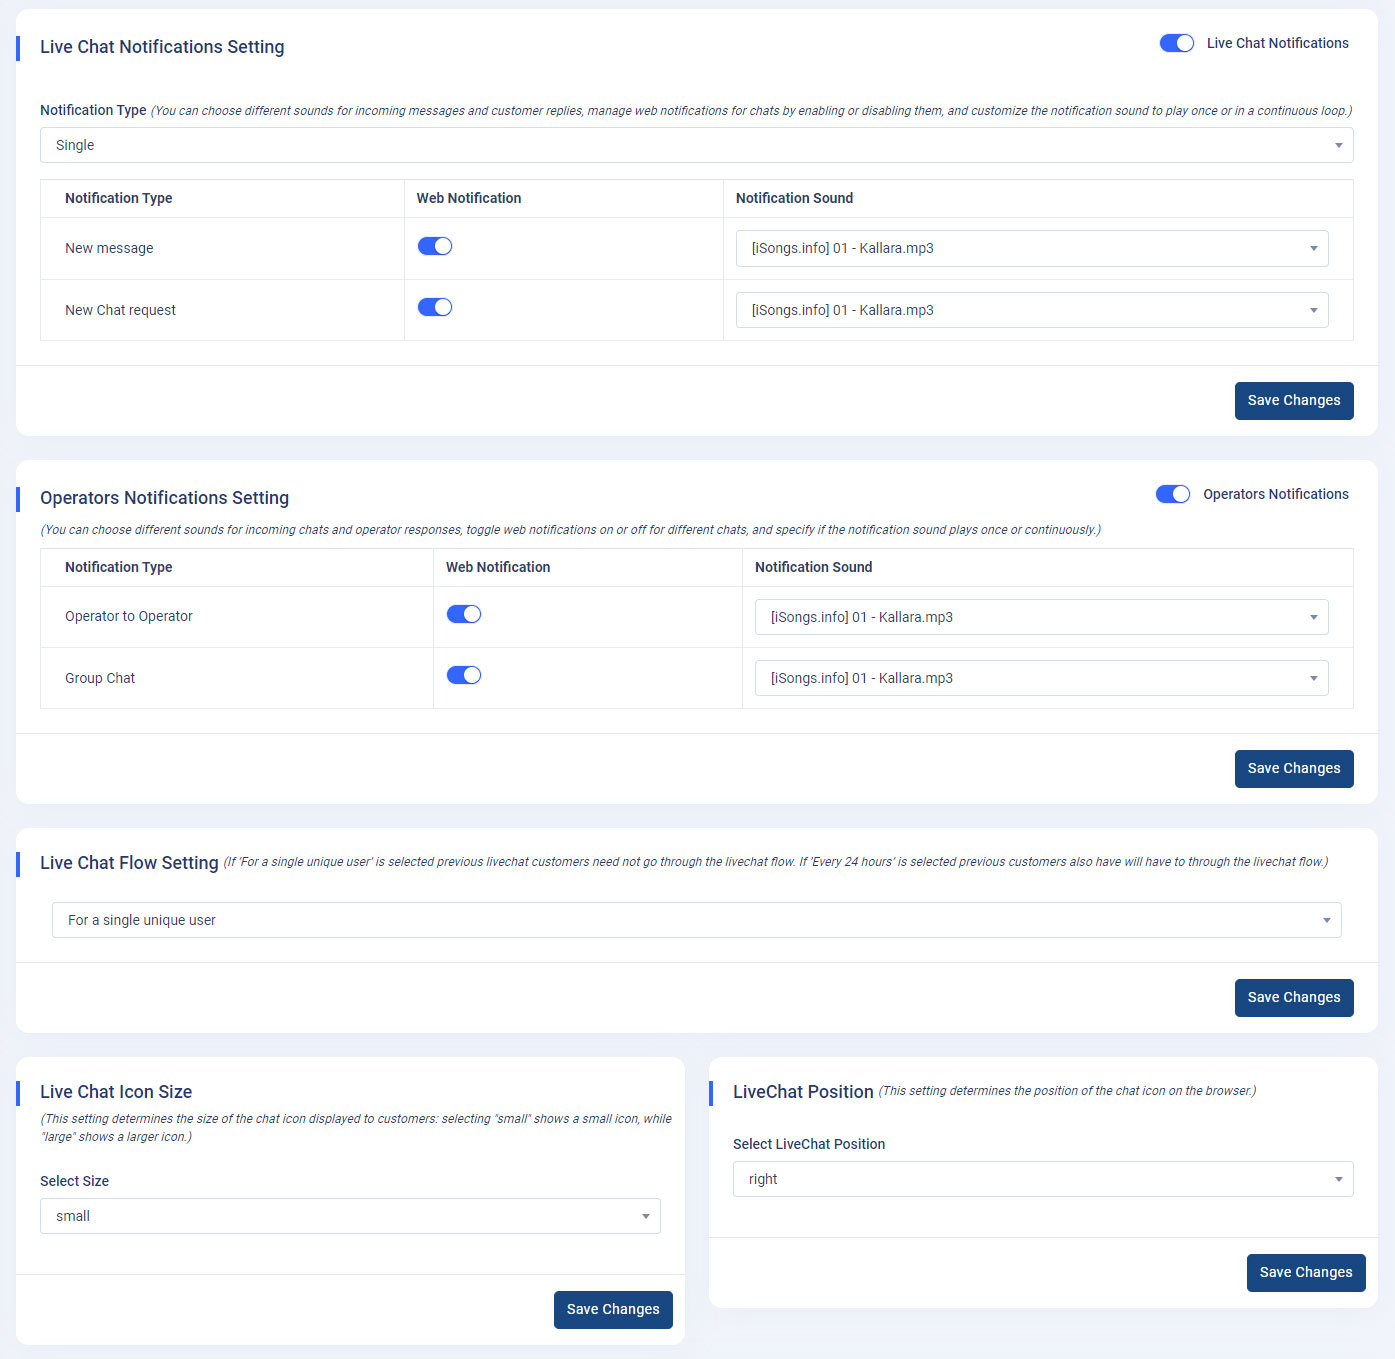
- Live Chat Notifications Setting
- Operators Notifications Setting
- Live Chat Flow Setting
- Live Chat Icon Size
- LiveChat Position
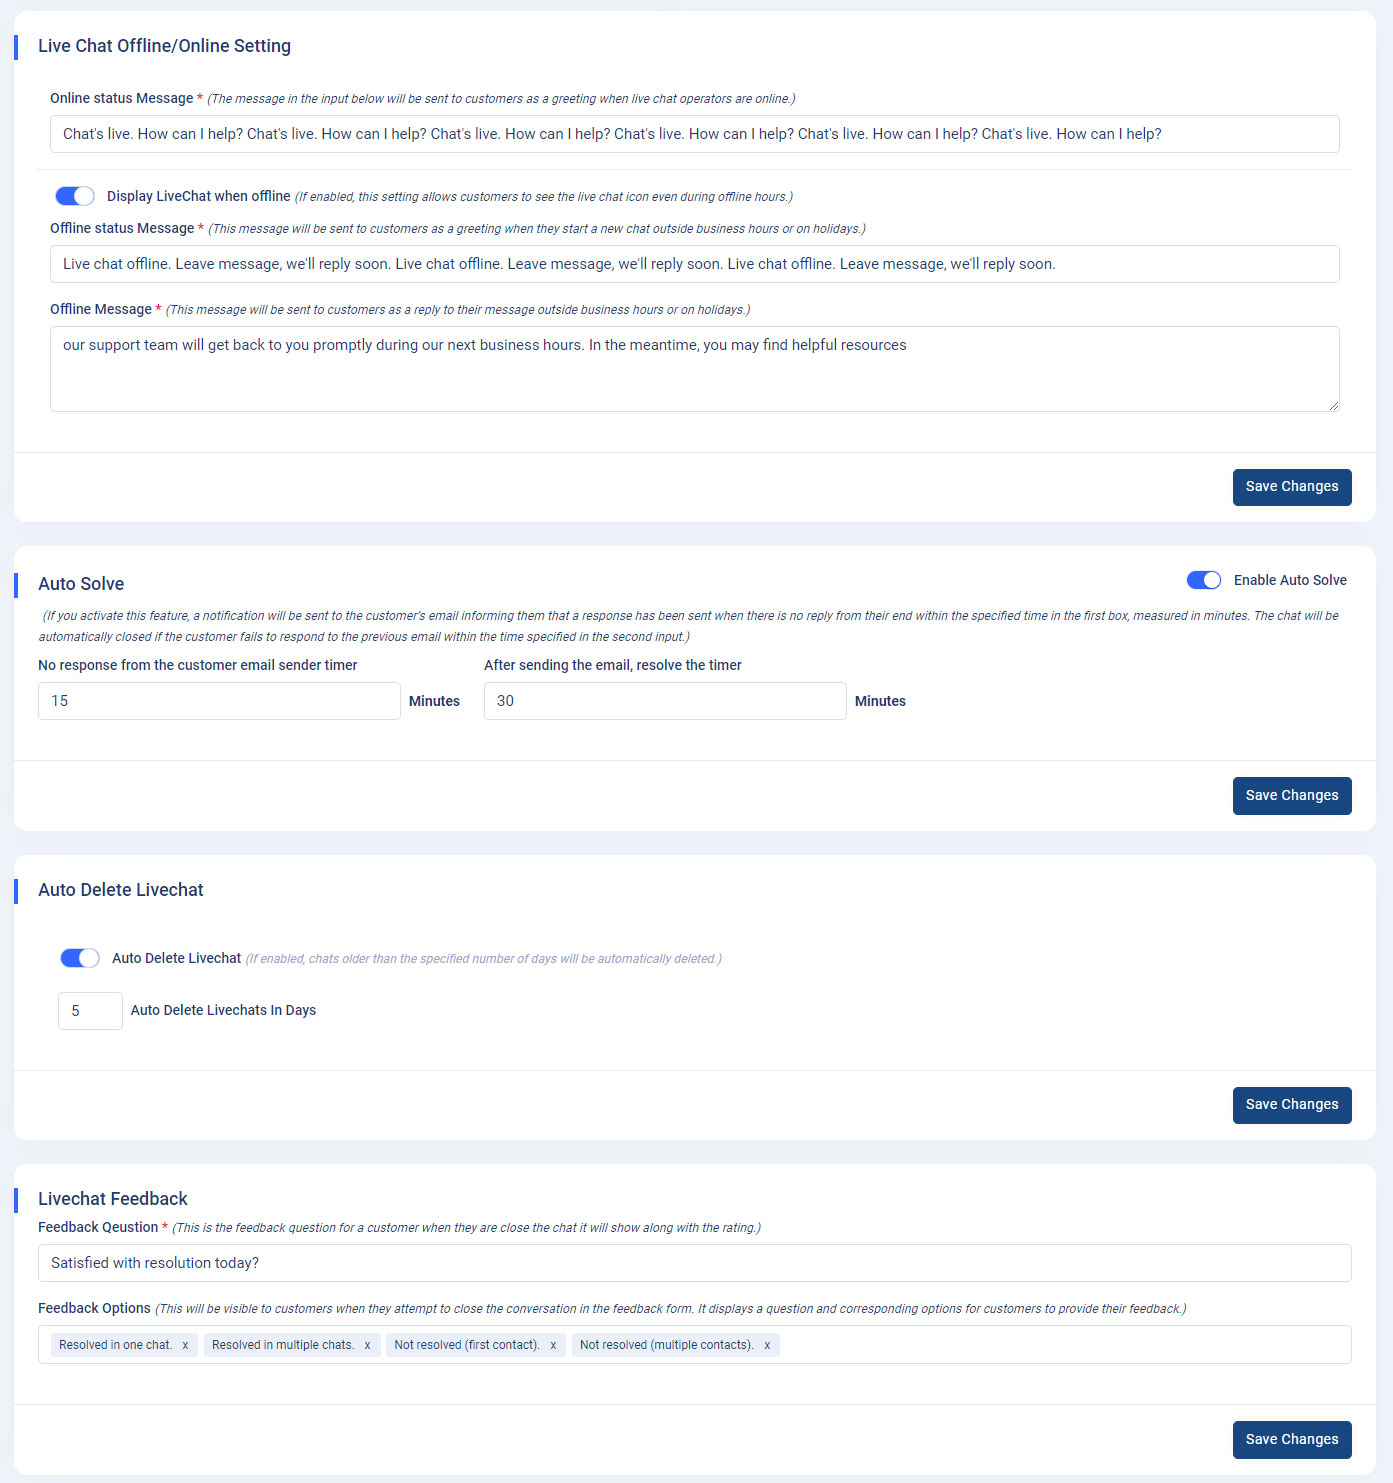
- Live Chat Offline/Online Setting
- Chat Auto Solve
- Auto Delete Livechat
- Feedback Dropdown
- Obtain the SSL Certificate and SSL Key from your server or domain where the application is hosted.
- Copy and paste the SSL Certificate and SSL Key data into the designated text areas on the "Live-chat Setting" page.
- Ensure that a valid SSL certificate is installed on your server to establish a secure connection.
- After entering the SSL data, click on the "Save Changes" button to apply the configuration.
- Upon successful connection establishment, the "SSL Data" section transitions into a disabled mode, indicating that the SSL settings are configured and connected to your server.
- Subsequently, the "LiveChat" section below becomes enabled for further configuration.
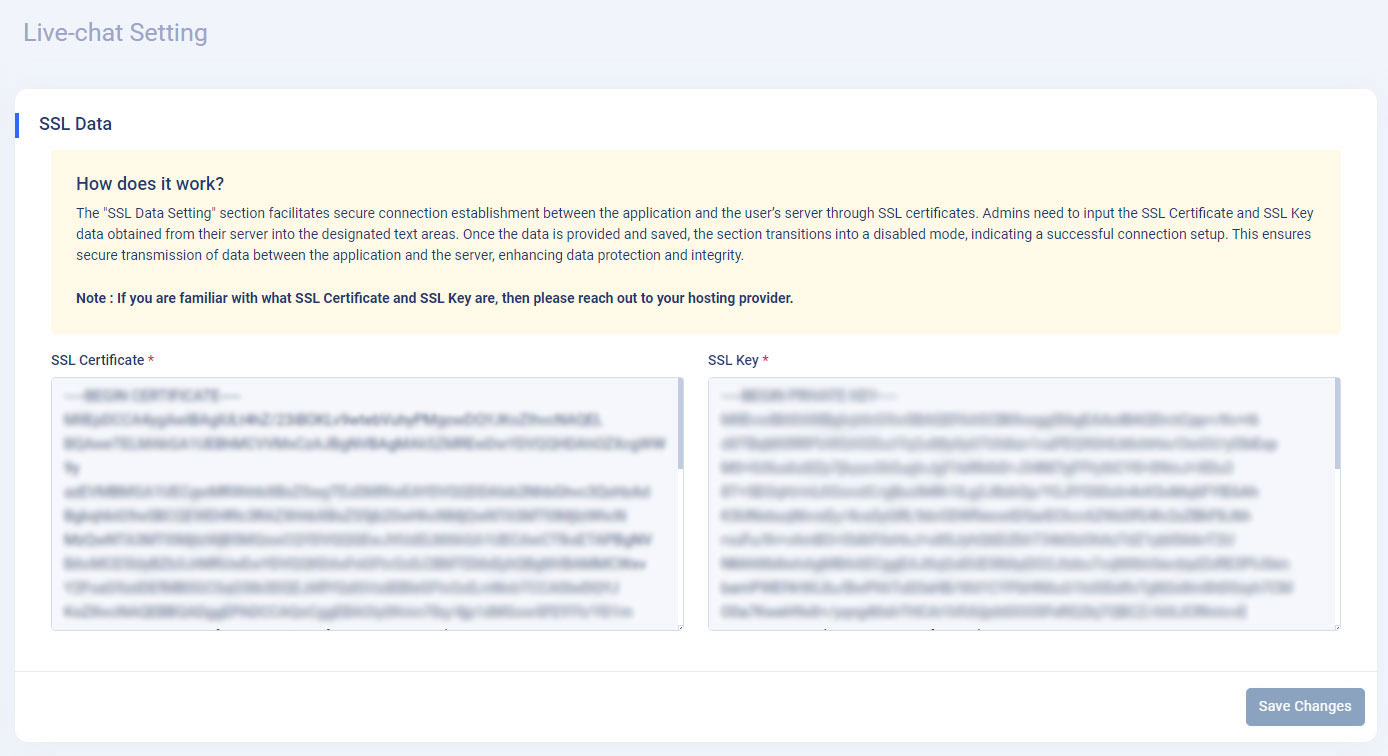
The "Live-chat Setting" page empowers users to configure essential settings related to live chat functionality, ensuring seamless communication and interaction with customers. By providing detailed instructions for configuring SSL data, the documentation aims to facilitate a smooth setup process, thereby enabling users to leverage live chat capabilities effectively.
2. LiveChat: In this LiveChat section, we have to setup two settings. "Enable LiveChat" and "Enter Port number for LiveChat"-
Enable LiveChat:
- Description: This setting features a toggle switch labeled "Enable LiveChat". Enabling this switch makes the live chat function accessible to customers, allowing them to initiate chat sessions with support operators.
- Usage: Toggle the switch to the "ON" position to activate the live chat feature.
-
Enter Port number for LiveChat:
- Description: In this setting, there's an input field labeled "Enter Port number for LiveChat". Admins can specify a port number to establish the LiveChat connection.
- Usage: Enter the desired port number in the input field, for example, "8443" or "8445". Ensure that the provided port number is available and open on your server. If the port is not open, contact your hosting provider to make it accessible on your server.
- Note: Users utilizing the Linux OS on their server must ensure they have "SUDO" access for proper configuration.
These settings collectively enable seamless integration and functionality of the live chat feature, enhancing customer support interactions and satisfaction.
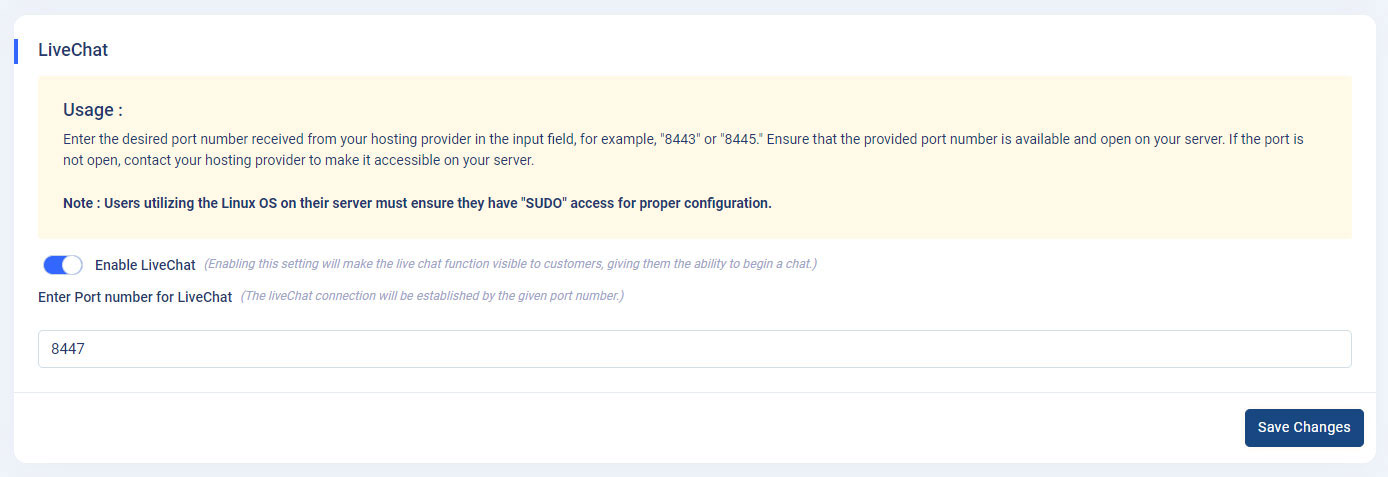
These settings empower admin panel users to configure and manage the LiveChat functionality efficiently, thereby bolstering customer support capabilities and fostering improved communication with customers.
3. Live Chat Script:-
Script Tag Link Example:
-
An automated script tag link will be generated, followed by your domain where the application is installed, for instance:
<script src='https://example.com/uhelp/build/assets/plugins/livechat/liveChat.js' wsPort='8443' domainName='https://example.com/uhelp' defer></script>. This link is crucial for integrating the chat icon into the application's interface/landing page.
-
An automated script tag link will be generated, followed by your domain where the application is installed, for instance:
-
Integration Process:
- Copy the provided script tag link.
- Navigate to the "App Setting" menu within the application.
- Click on the "External Chat" submenu. This action redirects you to the "External Chat" page.
-
External Chat Configuration:
- On the "External Chat" page, locate the "External Chat" text area.
- Paste the copied script tag link into this text area. This step ensures that the chat icon becomes visible to customers, enabling them to initiate chat sessions with support operators.
- And moreover, you can also use this script tag link on any other website, but make sure that you paste this code snippet just before the